As developers we often have to manage complexity in code or architecture but what happens when complexity creeps in on us in our favorite safe and comfortable space, development environment?
When we started our journey of migrating from Vagrant to Docker and Docker Compose we felt that problem hard. Our application is running in several different countries, each of which has a slightly different configuration, different ENV variables, and a separate database. When we had all of this tucked inside Vagrant it was relatively easy to manage but after the switch the commands to even start working got unwieldy.
We tried to fix the problem by creating a Confluence page with the most common snippets and then copypasting them every day when we needed to start the app, stop the app or access the console but the problem kept growing and became more and more annoying. At that point, we realized that we could use one, standardized command-line tool that will allow everyone to be productive without having to be an expert in all the fine details of our local stack.
Since we’re huge fans of Kaizen days (1 day where the entire developer team can decide to improve whatever they want in our application or stack on their own), we decided to build that tool.
We called it Helpling Toolbelt.
The rewrite
The 1.0 version of the tool was written using Thor and it was relatively simple, just our Confluence snippets wrapped in a simplistic command runner but our hunger for amazing and useful solutions kept growing and could no longer be tamed by something this simple. It was time to rewrite.
Helpling Toolbelt (or HT as we call it) 2.0 was rewritten from scratch using libraries that felt more adequate to the task. We switched from Thor to dry-cli (then hanami-cli) as it allowed us better control over longer and more complex commands with options and arguments. We also introduced plenty of TTY Toolkit libraries like tty-prompt, tty-spinner or tty-markdown for nice changelog printing after an update. We are still using colorize gem instead of pastel though, mostly due to the fact it was used in the 1.0 version and we never felt the need to update.
But let’s not talk about the technicals all this time. What does Helpling Toolbelt bring us internally to the table and why do we bother with developing, upgrading, and maintaining it for so long (and plan to do so for the foreseeable future)?
Starting the app
Since we’re using Docker Compose with multiple projects, each project being a separate country, to start an instance we had to copy-paste this snippet of code every time:
COUNTRY="de" docker-compose up -f docker-compose.docker-sync.yml -p de upAs you can imagine, this was far from perfect – not only you had to copy-paste this every time (or set a custom alias), if there was something wrong happening with starting the instance, you would have to sort it out yourself. This may not be a problem for our full-stack and backend developers but if someone’s a front-end developer with almost no knowledge of Ruby, it was really cumbersome and ended up wasting everyone’s time.
Initially, Helpling Toolbelt did just that – after running ht up it ran this exact snippet and only replaced country with whatever country developer wanted to run. A major part of the HT 3.0 version was changing the way our command ht up works.
Rather than only start docker-compose and let the developer deal with the technicals, we decided to switch to a multi-step approach. Currently, our tool does several sanity checks:
- checks if you’re connected to our VPN
- makes sure the testing database is fetched and in the latest version
- starts docker-sync or mutagen (more on that later)
- starts the containers
- ensures that all Ruby gems are up to date
- waits for Nginx to respond with 200 meaning the app is completely up and running
- runs any pending database migrations
- starts spring server for faster command running (more on that later)
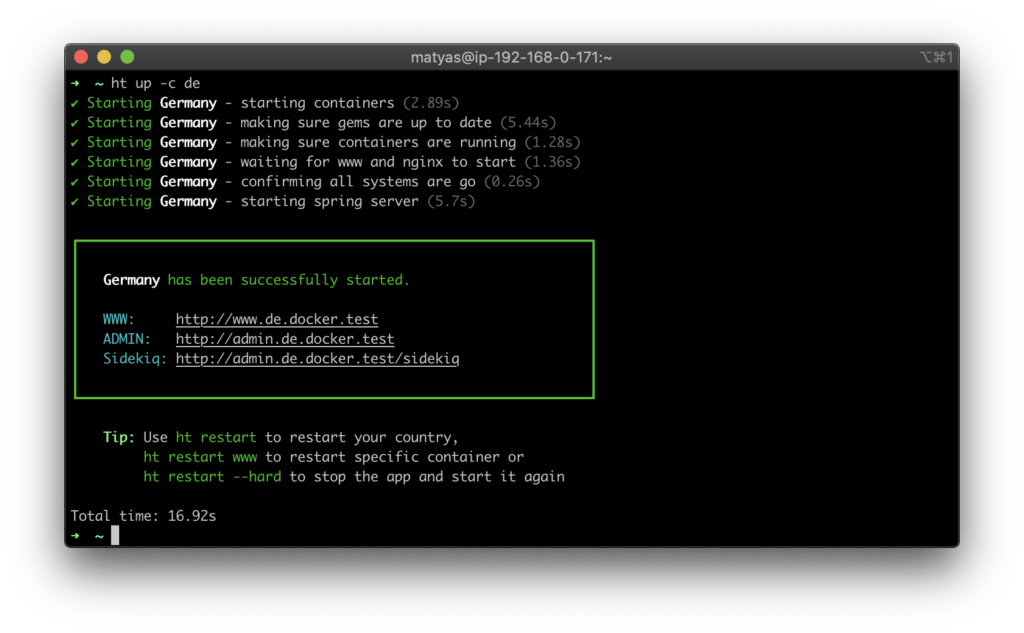
As you can see, using tty-spinner gives us a very polished feeling while keeping all the important information intact. There’s obviously --verbose command for more complex debugging too that disables hiding the information.
Front-end apps support
Our application is not just a Rails monolith. Over time we extracted parts of it into separate React and React Native (Expo) apps. This means the local environment got even more complex but fortunately, we solved this by introducing a suite of tools to make things easier.
There are several common things that you need to take into account when running an app in a multi-country setup. There are ENV variables that you need to set, caches that sometimes require busting and webpack instances that need restarting. We made it all work under one command called ht fe up.
The way ht fe up works is once again multi-step:
When running ht fe up on a project that does not exist locally, we fetch it automatically from GitHub (to simplify things you need one directory for all projects, ht asks you for it and you can change it at any time). We also run a yarn check --integrity on the node modules and run yarn (install) if any of the modules are missing.
We introduced our custom .htconf.yml file that includes specific project configurations which enables us to also clear the cache when needed (when ENV variables changed, for example, because of changing a country, or when there are any node modules changes) and has the information on how to start a project. The last part is a simple watcher that starts webpack and then keeps checking if ENV configuration changed so it can restart the process when needed.
All that in one simple command!
Different synchronization strategies
You might’ve noticed the non-standard docker-compose.docker-sync.yml file in the Starting the app section – that’s because we currently support three different syncing strategies internally – NFS, docker-sync and mutagen. Each of them has its own set of pros and cons and depending on the developer, the work they’re doing and their individual preferences we decided it’s best to keep our options open. This also allows us to experiment with different syncing strategies and see which one works for us best – for example, mutagen support was added only recently and it’s still considered experimental since it requires some custom hacks to work properly.
Connecting to remote servers
Our infrastructure consists of different types of servers and there are different methods of accessing each. We made it simple with a set of ht remote commands. We have a separate command for console and ssh but also log for server logs. This makes it much easier to figure out what needs to be done to debug an issue on a testing instance or check a specific bug on staging.
Making things fast(er)
As you can imagine, a Rails application is not exactly a demon of speed, and adding Docker on top definitely doesn’t help. How did we improve the speed of common developer actions?
The most important trick was to run the spring server. But how does one run the spring server using Docker, isn’t every docker run a new container? Well, yes, but you can spawn a session on already running containers with docker exec!
The way it works is that when starting a country with ht up we connect to our www container with docker exec and we spin a spring server there that we detach from the running terminal (so it keeps running after we close the session):
docker exec -it (www container id) bash -c "nohup spring start 2>&1 >/dev/null"Then, every time someone needs to run a command like ht bundle install or ht rake some_command we check if the www container is still running. If it is, we once again connect with docker exec and prefix the command with spring and if it’s not, we run it normally (so you can still run bundle install even when your server is not running).
The difference was massive – running ht console (Rails console) now takes several seconds instead of almost a minute!
Setting up the local environment
One of the major problems of projects that exist for a long time is the number of things you need to set up on your machine before you’re even able to launch the app. Ruby, additional libraries, setting /etc/hosts or even installing homebrew on Mac – all of those take time, require explaining, and often manual hand-holding. One of the important features of HT these days is the autoconfiguration of the environment. The major idea is as follows: if you need something to start the app, the CLI tool should install or propose installing it for you.
The “Don’t make me think” mantra applies here too!
Packaging the tool
One of the frustrating features of using Bundler in your CLI tool and developing it either as a gem or even just a normal Ruby project dropped in the directory is that it’s now dependent on the Ruby version you’re running locally. This can cause friction if you’re using a tool like rvm or asdf and can have multiple Ruby versions around. To solve this problem we’re creating a binary package using ruby-packer that we’re building on our CI before every new version release. This has the extra benefit of no longer requiring Ruby locally to work.
Interestingly enough, it also seems to make the tool slightly faster (around ~40ms of boot time).
There are various different tools and utilities that are part of Helpling Toolbelt that were not listed in this blog post. Attaching to running container to connect to binding.pry, running rspec tests with open VNC connection to selenium (with an information box reminding you on how to connect with a clickable link to the VNC session), a development database image manager, a markdown-formatted CHANGELOG that shows up whenever the tool updates (with ht update doing all the work)… There are almost 60 subcommands available right now and new features are added (or removed) periodically.
All of this may sound like a lot but keep in mind we’ve been adding new features and organically growing this tool for 3 years now. Which brings us to the main point of this post – the sooner you introduce something like this in your project, the better! Happy coding!